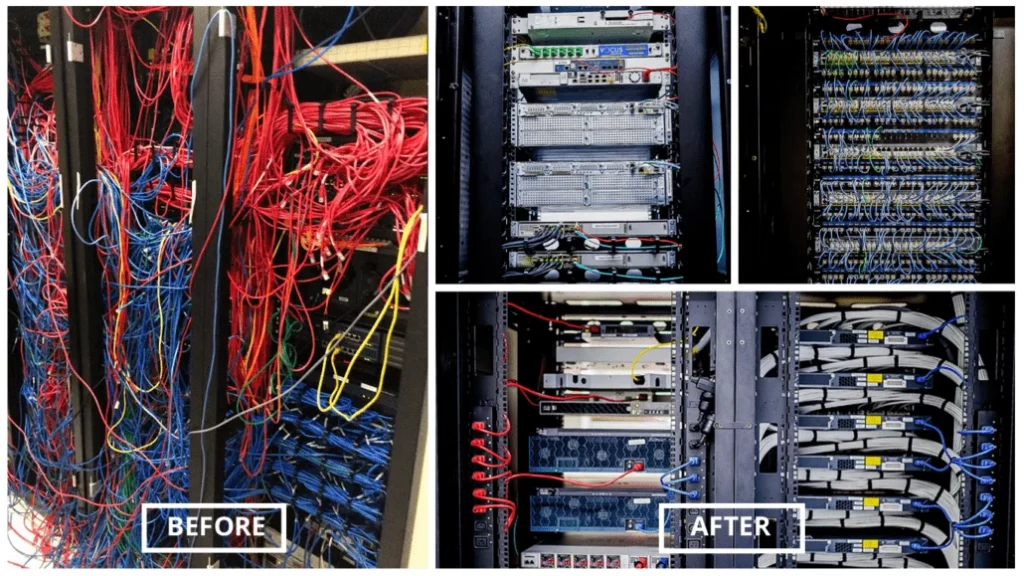
We all know about the horror stories. They go by many names: rats’ nest, birds’ nest, spaghetti cabling. And unfortunately, they are all too common place.
It usually stems from a rushed implementation. In the heat of a Severity 1 incident someone does a rushed patch to get a server back online. The intention is there to come back and re-run the cable but somehow they just never get around to it. But now it’s a slippery slope as a precedent has been set. One hack begets another and before you know it you are living in a cabling nightmare.
That is exactly where I found myself recently while managing an office relocation for a client. So I seized the opportunity to ensure that the rack layout was designed and implemented properly right from the outset.
Here are 10 tips I’ve picked up over the years to bear in mind when planning your rack layout:
- If given the choice, go for bigger racks. 45RU, 800mm wide x 1000mm deep provide additional room for vertical and horizontal cable management. Map out your design in Visio and be meticulous.
- Install fibre termination units outside your racks (i.e. wall mounted). This not only saves you rack space but more importantly it allows you to move your racks later without having to resplice – just replace the fibre patch leads instead.
- Flood patching (i.e. patch panel > switch > patch panel > switch etc) allows you to cable all patch panel ports right from the outset, minimising the need to re-patch later. Invariably, it is these quick hack cabling jobs compounding that makes a rack unserviceable over time.
- Use short patch leads – order in or custom make if you must. Slimline patch cables are great for ensuring visibility of port labelling.
- Do not run cable in front of other equipment: if that equipment requires maintenance, you’ll have to remove the cable, resulting in an outage of non-affected equipment. Run cable horizontally into the cable management trays instead to get around the equipment.
- Define a colour coding standard (if you haven’t already got one) and stick to it. That goes for power cabling too. For equipment with no power resilience, consider implementing an automatic transfer switch to remove that single point of failure.
- Avoid running data and power cabling together: run data down one side of the rack and power down the other. Where power and data meet, intersect at right angles to minimise attenuation, particularly if you are running unshielded data cable.
- Controversial I know, but I’m a big advocate for leaving 1RU gaps between equipment. These days, power is the limiting factor in rack design so why cramp everything together? Extra space means easier serviceability. If you are worried about airflow, buy some blanking plates.
- Similarly controversial: ditch the cable management arms. They look messy, snag on other equipment and block airflow. Use Velco for cable management instead.
- Rack heavy equipment (like UPS) at the bottom of the rack for stability of the rack (and to save you lifting something heavy higher than you have to). Everything else, rack from the top down. This is particularly important if you disregard point 8 above as each piece of equipment will add pressure on the equipment below, making it difficult to remove later. Keep your physical rack layout in line with the logical network design (e.g. “untrusted” equipment like carrier NTUs, CPEs or firewalls at the top).
If you’re planning an office or data centre relocation and are keen for your racks to be set up properly right from the start, or if you need some help cleaning up your existing deployment, we’d be delighted to help.
If you’re looking for consultancy services on your company’s security policy, contact Starboard IT to find out what we can do for you.


